There are two direct mail services that we use and that you may hear mentioned in the Investment Dominator and Land Profit Generator community.

REI Print Mail is our recommended mailing service simply because it has a native integration with the Investment Dominator which means you can generate and track your direct mail orders and campaigns from within your system. For more information about our REI Print Mail integration click here.

The other mailing service that we sometimes mention is ITI Direct (also sometimes referred to as LetterPrinting.com or LPGLetters.com). The Investment Dominator can generate ITI Direct templates and recipients for built-in document templates only. For more information about how to do that, please click here.
In this article, we will explore the steps on how to create a Custom ITI Direct Template and Recipient file.
How To Create A ITI Direct Campaign For A Custom Document
Step 1: Create an Order with ITI Direct
To get things started, you will need to create an order with ITI Direct. Use our referral link LPGLetters.com to get to the correct area of their website.
Fill out the specifications of your order like what type of paper and envelope style that you would like to use, as well as details like if you want your documents printed on black and white or color ink.
Once your order is created you will need to upload 3 files:
- Your Letter Template (as a .pdf)
- Your Envelope Template (as a .pdf)
- Your Recipient List (as a .csv file)
Each of these files needs to be in a specific format in order for ITI to process your order quickly.
Step 2: Generate Your .PDF Templates
Create Your Custom Letter Template
You will need to have a word processor like Microsoft Word or Google Docs in order to proceed.
- First, download a sample .docx file here to start.
- Open the file in your word processor (Microsoft Word or Google Docs) and then add your custom content to the document.
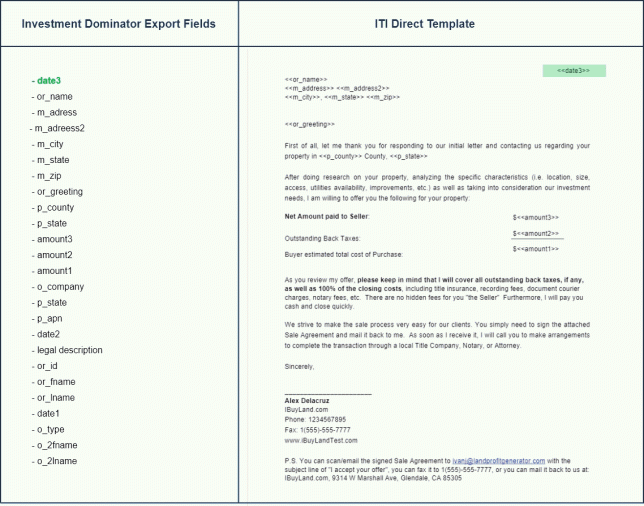
Wherever you want to add dynamic merged content you can use a merge tag that looks like this <<Column Name>>. The tag consists of the << characters followed by the exact column name (this is case sensitive), followed by >>.
In the sample file, you will see some merge fields referenced so you know how it should look.
IMPORTANT!
ITI Direct only allows you to use specific column names. So both your template files as well as your .csv recipient list can only contain specific column names and merge fields. We have a complete list of these acceptable column names and merge fields referenced below. Click here to view the list now. - Once your letter template is ready, do a File> Save As> .pdf because this is the format ITI Direct needs the template in.
Create Your Custom Envelope Template
- Download this sample .docx envelope template here.
- Open this in a word processor like Microsoft Word or Google Docs
- Update the envelope with your custom content but ensure that wherever you want to add dynamic merged content to use one of their accepted merge fields that looks like this <<Column Name>>. Click here to review a complete list of accepted column names for your .csv recipient list and merge fields for your templates.
- When your envelope is ready, do a File> Save As> .pdf because this is the format ITI Direct needs the template in.
Step 3: Generate Your Recipient List
IMPORTANT!
ITI Direct needs to have a recipient list in a .csv format and this file should only include columns that contain data you would like to merge into your letter or envelope templates. This means that if you are using the <<Mail Date>> merge field in your letter template then you must have a corresponding column in your .csv file called Mail Date.
- Download this sample .csv recipient list here and open it in a data processing software like Microsoft Excel or Google Sheets.
- You can export the records that you want in your recipient list from the Investment Dominator then change the column header values to match approved column names referenced below here. Remember to only include the columns of information that you want to print to your template files, for example, if you do not have a merge field called <<APN>> referenced in your template file, then you should also NOT have an APN column in your .csv file.
- Once your recipient list is complete do a File> Save As> .csv because this is the format ITI Direct needs the recipient list in.
Step 4: Upload Your Files To ITI Direct To Complete Your Order
Once you have your .pdf letter template file, .pdf envelope template file, and your .csv recipient list ready, simply upload these three files to your ITI Direct order ticket to proceed with the order.
NOTE: Because we do not have a native integration with ITI Direct, our support team cannot assist you with custom orders like this, nor track the progress of your order with them. Questions about your ITI Direct order must be sent to their support directly. If you would like a more integrated experience, please check out our REI Print Mail native integration option here.
Accepted ITI Direct Column Names and Merge Fields
IMPORTANT: These column names and merge field values are case sensitive.
| Column Names | Merge Fields |
| Full Name | <<Full Name>> |
| First Name1 | <<First Name1>> |
| Last Name1 | <<Last Name1>> |
| First Name2 | <<First Name2>> |
| Last Name2 | <<Last Name2>> |
| Company | <<Company>> |
| Address1 | <<Address1>> |
| Address2 | <<Address2>> |
| City | <<City>> |
| State | <<State>> |
| Zip | <<Zip>> |
| Country | <<Country>> |
| Reference No | <<Reference No>> |
| APN | <<APN>> |
| Phone | <<Phone>> |
| Salutation | <<Salutation>> |
| <<Email>> | |
| Property_Address | <<Property_Address>> |
| Property_City | <<Property_City>> |
| Property_State | <<Property_State>> |
| Property_Zip | <<Property_Zip>> |
| Property_County | <<Property_County>> |
| Amount1 | <<Amount1>> |
| Amount2 | <<Amount2>> |
| Amount3 | <<Amount3>> |
| Date1 | <<Date1>> |
| Date2 | <<Date2>> |
| Date3 | <<Date3>> |
| Mail date | <<Mail date>> |
| Expiration date | <<Expiration date>> |
| Closing date | <<Closing date>> |
| Legal Description | <<Legal Description>> |
| Type | <<Type>> |
| Acres | <<Acres>> |
| Return name | <<Return name>> |
| Return address | <<Return address>> |
| Return City | <<Return City>> |
| Return State | <<Return State>> |
| Return Zip | <<Return Zip>> |
| Misc1 | <<Misc1>> |
| Misc2 | <<Misc2>> |
| Misc3 | <<Misc3>> |
| Misc4 | <<Misc4>> |
| Misc5 | <<Misc5>> |
| Misc6 | <<Misc6>> |
| Misc7 | <<Misc7>> |
| Misc8 | <<Misc8>> |
| Misc9 | <<Misc9>> |
| Misc10 | <<Misc10>> |
| Version | <<Version>> |