What is Zapier?
Zapier is a simple and easy-to-use tool that connects apps together and automates repetitive tasks. To learn more about Zapier take a few minutes to watch this quick overview video:
The Investment Dominator Zapier App
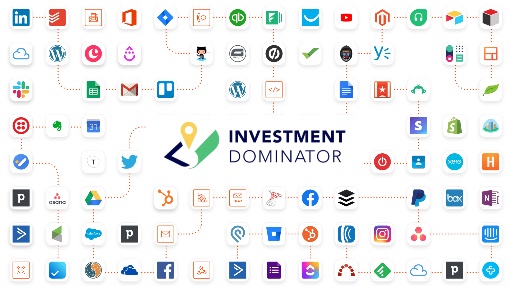
The Investment Dominator Zapier App is the fastest and easiest way to connect your Investment Dominator system with over 7,351 (and counting) other 3rd party apps on Zapier.

It’s fast because you only need to set up the integration once and then Zapier automates the workflow between the connected apps from then on.
NOTE: You can find the Investment Dominator Zapier app on the Zapier App Directory by typing in “Investment Dominator” into their search bar:

Or click here to go directly to our Zapier listing: https://zapier.com/apps/investment-dominator/integrations
It’s easy and affordable because instead of connecting to APIs and programming custom functionality yourself, or hiring that out to an experienced programmer, you can simply use Zapier’s AI powered zap builder and enter in the names of the apps you want to connect to and what tasks you would like it to automate:

Why Connect with Other Apps?
In today’s world, there seems to be an app for anything and everything, and new ones pop up each day. These apps include everything from popular social media platforms like Facebook that you can leverage to drive awareness to your business, to email providers like Gmail and phone systems like RingCentral that you can use to communicate with your buyers and sellers. Each one of these apps has a purpose and offer specialty features that you can leverage for your land business, and we want to make it as easy as we can to facilitate the connection through Zapier and help you automate.
Here are just some examples of Zapier integrations you can set up, but really the possibilities are endless:
- https://guides.investmentdominator.com/zapier-how-to-connect-the-investment-dominator-to-google-sheets/
- https://guides.investmentdominator.com/how-to-set-up-an-api-with-the-investment-dominator/
- https://guides.investmentdominator.com/zapier-how-to-connect-the-investment-dominator-to-esignatures-io/
- https://guides.investmentdominator.com/zapier-how-to-connect-the-investment-dominator-to-docusign/
- https://guides.investmentdominator.com/zapier-how-to-connect-the-investment-dominator-to-hellosign/
- https://guides.investmentdominator.com/zapier-how-to-connect-the-investment-dominator-to-ring-central/
- https://guides.investmentdominator.com/zapier-how-to-connect-callrail-with-the-investment-dominator/
- https://guides.investmentdominator.com/zapier-how-to-connect-the-investment-dominator-to-slybroadcast/
- Click here to view a complete list of Zapier-related articles: https://guides.investmentdominator.com/?s=zapier
How To Get Started with Zapier?
Getting started is simple as creating a zapier.com account. Zapier has everything from a Free basic use account to an enterprise account. You can get more details on the different account types they offer here: https://zapier.com/pricing but to start off we recommend signing up with their Free account. If later, you want to set up more advanced automated workflows you will need to upgrade to a paid version eventually.
I Have a Zapier Account… Now What?
Now that you have an account you can click the orange [+Create] button to setup a workflow from scratch, or simply type in how you want the workflow to function under the “What would you like to automate?” input field:

Connect To Your Investment Dominator
As you create your Zapier workflow you will be prompted to connect to your Investment Dominator:

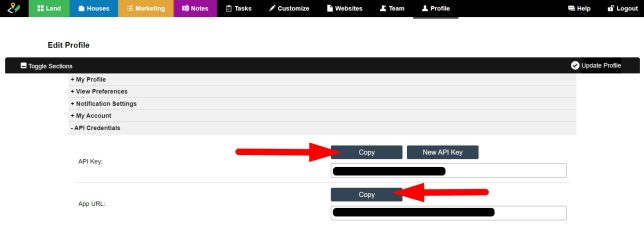
And this is as simple as copying your API Key and App URL from under the ‘Profile> API Credentials’ area of your Investment Dominator Admin Console:

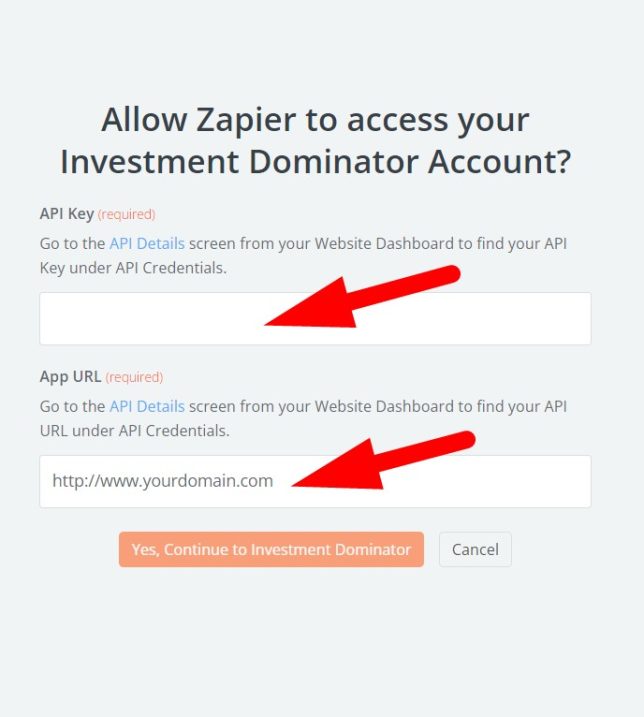
Then paste those details under the Zapier connection screen and click the [yes, Continue To Investment Dominator] button:

Completing this connection means that Zapier is now connected to your Investment Dominator system through the API and as you setup different Zapier connections and workflows they will prompt you to also connect to the other 3rd party applications that are also part of your workflow.
Zap 101
Zapier Zaps, or the automated workflow between two or more apps all follow a simple Trigger/Action structure. You can get as complex as you want with your zaps, but the basic structure will always be that you need to define an app to set a trigger action that prompts Zapier to start the automated workflow and then you select another app to perform the action step in.
Some examples are:
Example A:
Trigger:
When a record in the Investment Dominator moves into the 'Offer Sent' status:Action:
Send owner an SMS Message from my RingCentral line to the owner.Example B:
Trigger:
When a record in the Investment Dominator moves into the 'Complete/ Ready To Sell' status:Action:
Update the property status to 'Offer Accepted' in the Investment Dominator.You can even make another app the Trigger and preform the Action in your Investment Dominator like this:
Example A:
Trigger:
When an offer document is signed in DocuSign:Action:
Update the property status to ‘Offer Accepted’ in the Investment Dominator.Example B:
Trigger:
When a contact record in MailChimp opts out:Action:
Update the contact's 'Email Status' in Investment Dominator to "Opted Out".If you would like to prevent a Zap from triggering mutiple duplicate actions review this article: https://guides.investmentdominator.com/how-to-stop-a-zapier-update-record-zap-from-triggering-multiple-times-for-the-same-record/
Again, these are basic Zap setups. In most real use cases you are also adding lookup steps, data validation steps, and formatting steps to your Zapier workflow for it to run perfectly. To learn more about that check out Zapier’s Learning Center where they have a ton of helpful resources.

